


A Step-by-Step Guide on Creating Metric Monitors in Datadog

Monitoring your infrastructure is crucial for ensuring the reliability and performance of your applications. Datadog, a powerful monitoring and analytics platform, allows you to keep a close eye on various metrics and set up monitors to get notified when certain conditions are met. In this guide, I’ll walk you through the process of creating a new monitor in Datadog using a metric.
You can read my previous article on introduction to monitoring and commonly used terms here

Prerequisites
Before you start creating monitors, ensure you have the following:
A Datadog account (Sign up at Datadog)
Datadog Agent installed on your servers or applications
Metrics streaming into Datadog (configured with your Datadog Agent)
Step 1: Choose a Metric
First step is to select a metric that you want to monitor.
Head over to Metrics section on the left menu and click on Explorer
Start typing in the metric text box to view all available metrics
Select a metric and apply queries or formulas as needed
In the picture below, I have selected the postgres database connection rollback hits as a metric. A high number of rollbacks indicate issues with transactions or queries. As you can see the value of this metric was pretty high on mid-day of January 8th.

Step 2: Navigate to Monitors
In the left sidebar, click on “Monitors”

Click on the Metric button as we’re creating a metric monitor.
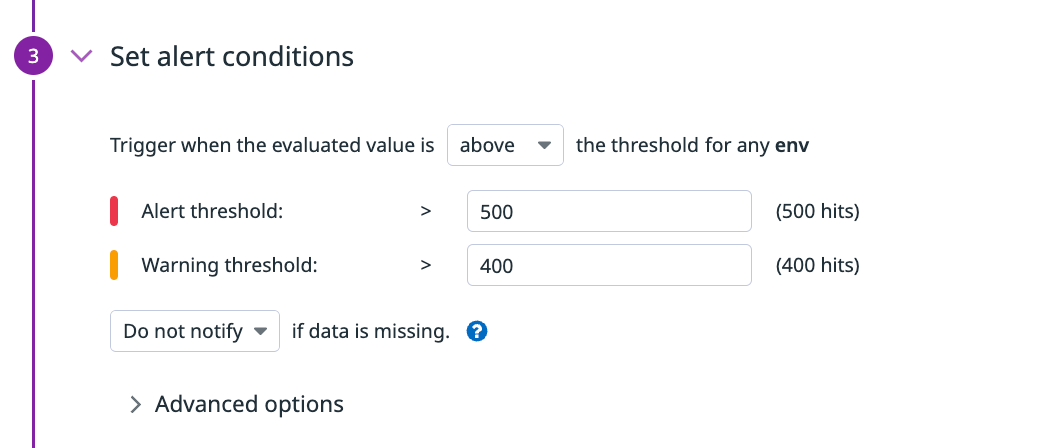
Step 3: Create a New Monitor
Type the metric name in the textbox and define the threshold limits as suited, like in the image below

Step 4: Set Notification Preferences
Under the "Notify your team" section, configure how and when you want to be notified. Datadog supports various notification channels, including email, Slack, PagerDuty, and more.
Set the timeframe for notifications. You can choose to receive notifications when the alert is active or only after a certain duration.
Define your notification message and settings and hit Create.

Step 7: Test Your Monitor (Optional)
To verify that your monitor works as expected, you can test it by triggering a simulated incident.
Click “Test Notifications” and follow the prompts to initiate a test event.
Congratulations! You've successfully created a monitor in Datadog using a metric. You're now equipped to receive timely alerts and proactively address potential issues in your infrastructure.
Conclusion
Datadog's monitoring capabilities empower you to gain valuable insights into your system's health. By creating monitors based on specific metrics, you can stay ahead of performance issues and ensure a seamless user experience. Experiment with different metrics, conditions, and notification settings to tailor your monitors to the unique needs of your applications and infrastructure.
Thanks for reading my post! Let’s stay in touch 👋🏼
🐦 Follow me on Twitter for real-time updates, tech discussions, and more.
🗞️ Subscribe to this newsletter for weekly posts.